
- Cable Coiling & Binding
- Tape Winding Machine
- Semi-Auto Wire Brush Machine
- Wire Cutting & Stripping
- Semi-Auto Crimping Machine
- Wire Stripper Crimper Blades
- Terminal Tensile Tester
- Cut-Off Machine
- Cable Labeling Machine
- Strapping Banding Tool
- Wire Terminals & Connectors
- Automated Tape Dispenser
- Automatic Wire Crimping Machine
- Terminal Crimping Tools
- Automatic Wire Feeder
- Automatic Soldering Machine
- Nylon Cable Tie Machine
- Injection Molding Machine
- Brazing & Welding Machine
- Screw Fastening Machine
- Power Cord Crimping Machine
- Wire Harness Tester
- Glue Dispensing Robot
- Wire Harness Packing Materials
New products
Home > Industry news
How to operate Coaxial cable stripping machine WPM-8608
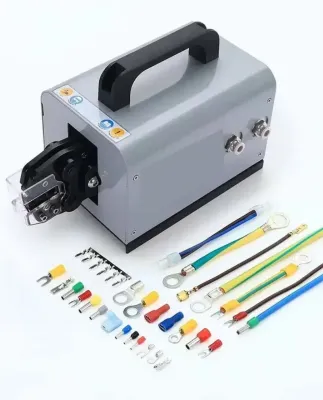
Coaxial cable stripping machine WPM-8608
Table of Content
1 . Description of Warranty List.....................P.3
2 . Safety Precautions ............................P.4
3 . Description of Device Operating Parameters…P.4
4 . Display Interface Operation Instructions...P.5-10
5 . Setting and Debugging of Wire Stripping
parameter...................P.11
6 . User Notice....................................P.12
I Description of Warranty List
1. The warranty period of the machine is one year(from the date of signing the delivery document or invoice). For any abnormal work or abnormal situation caused by the machine quality within one year, please contact our maintenance department or sales department.
2 . Please keep these machine instructions. The warranty should be conducted according to the content of this manual and the machine number on the warranty card.
3. If you want to transfer this machine during the warranty period, please forward this manual to the next owner together with the machine.
4. After the warranty period, the user can ship the machine to our company or our company send the maintenance personnel for repair. but the travel expense of the maintenance personnel should be borne by your company, and if necessary, the cost of the accessories should be shared for the accessories replacement.
Device Configuration List
Item Name (model) Quantity Remark
1 One-year warranty
2 Footswitch One is Not within the warranty scope
3 Blade One pair Not within the warranty scope
4 Tool (internal hexagonal wrench) One set Not within the warranty scope
5 Power line One Not within the warranty scope
6 Manual One Not within the warranty scope
7 Toolkit(Toolbag) One Not within the warranty scope
II Safety Precautions
1. Before using the machine, users must read this manual in detail and then use the machine correctly to avoid unnecessary accidents ad shorten the service life of the machine itself.
2. When placing the machine, it should be placed on a working table with a solid horizontal line (able to withstand more than 50kg weight) to make the machine place smoothly.
3. Before turning on the power, please check if the power supply is correct (AC220V/50HZ) and if the supply power should be according to the purchased equipment.
4. Wire stripping can be tried after data adjustment and for the blade and the parameter setting, please refer to the manual for debugging.
IV Display Interface Operation Instructions After turning on the power, screen 1 will appear:
1. English: Enter the English interface.
2. Home screen: Enter the Chinese interface.
I Home screen
1. Start: is a device running switch and the display starts.
2. Stop: Press this button and the machine will stop urgently. If you want to restart it, press the "Reset" button.
3. Reset: When turning on the power, it can be started after resetting with the parameter setting, after the “number of layers” change, it can be started after reset; after “detailed screen to change the thread”, it can be started after reset; and after entering “detailed settings”, it can be started after a reset.
4. Count clear: press this button and the current output is 0, and you can also directly input the number at the location of "yield".
5. Program Copy: Copy the data from an existing program to another program: 00-99 can be copied.
6. Button initiate: entering "0" is the button initiate, and entering "1" is the foot start. select a start mode and then reset to start.
7. Program: refers to the specifications of the wire to be processed (thread, stripping head, wire diameter, retreat, speed, yield, and other parameters) Each program number stores a kind of processing wire data, and the corresponding processing wire is used by changing the program number Program: 00-99.
8. Linkage: Let the machine move continuously and select “button initiate” and enter “0” on screen 2 and then select “linkage” and enter the gap time, for example: enter 500=5 seconds and enter “0” to cancel the linkage.
9. Total: The number of current stripping plans.
10. Production: the total amount of current production.
11. Number of layers: after the number of layers of stripping head is set, the number of processing layers can automatically appear to facilitate identification.
12. Distance: display the distance between the current blade head from the origin.
13. Start screen: return to the screen displayed when the power is turned on.
14. Manual screen: enter this screen and each action can be observed, t facilitate the manual transfer, tool change, or thread jamming use.
15. The current (A)end: refers to the end being processed for the current display. There are both ends, A, and B.
III Parameter screen introduction
1. Automatic advance speed: (0-9) refers to the speed of the blade head during forwarding. the greater the debugging data is, the higher the speed is, and vice versa, it is slower.
2. Automatic feeding speed: (0-9) refers to the speed of the knife in the partial cut-off wire or cut-off line sheath. The cutting speed should be slower for the thicker wire, otherwise, the tool will be damaged.
3. Automatic clamping speed: (0-9) refers to the speed of the clamp in the automatic thread clamping. The clamping speed should be lower for the thicker wire, otherwise the eccentric will be clamped.
4. Automatic stripping speed: (0-9) refers to the speed of the blade in the rubber peeling after wire cutting off. The bigger the data is, the higher the speed is. For the thicker wire, the stripping should be longer and the speed should be lower, otherwise, the tool will be seriously damaged.
5. Spinning stripping speed: (0-9) refers to the speed of the blade in the spinning stripping, which refers that the knife head continues rotating during knife head stripping.
6. Rotary speed: rotary speed refers to the speed of the knife head rotation and the set value should not exceed 10 or more of the factory value.
7. Clamping diameter: (0-7.5) refers to the clamping value when the clamping wire clamps the wire.
8. Clamping jaw opening: (0-14)refers to the distance between the jaw and the opening.
9. Number of layers: refers to the layers of the wires being processed by the current setting
10. Blowing time: refers to the blowing time after one layer stripping, and “0” is no blowing.
11. Shaking switch: refers to shaking the waste material after each layer stripping by rotation.
12. Home screen: press this button to enter the home screen directly.
13. Detailed setting: press this button to enter the setup screen.
IV Introduction of Detailed Setting
1. Thread: (0-48)(refers to the actual length of each layer stripped.
2. Stripping head (0-48) refers to the length from the front end to the peeling location needing to be stripped. When the stripping head value is greater than the thread value, it is full stripping and when the head value is less than the thread value, it is half stripping. When the value is 0, there is just rotation without peeling.
3. Wire diameter: (0-7) refers to the wire cutting depth. The smaller the value is, the deeper the rotation is. The bigger the value is, the bigger the rotation diameter is.
4. Retreat: (0-5) refers to the value of the two blades' retreat after the wire rotation peeling. If the retreat is “0”, that means no retreat action, resulting in the adverse consequence of scraping copper wire or damaged blade. The thicker the wire sheath is, the bigger the value is. The thinner, the smaller.
5. Cutting time: (0-10) refers to the stopping time of the stripping head at the set depth in the rotation. And the value can be set to 0-9.9 (generally default for 0.3s).
6. Rotary stripping (0-9) refers to peeing in rotation during wire stepping (This function can twist wires). If it is set to “0”, that means no rotary stripping.
7 Rotation direction: refers to the rotation direction of the stripping head in the rotary stripping, that is reversing, cutting depth parameter (wire diameter) which will be different from the actual effect.
V Input Screen
1. A number window will automatically pop up when setting the
parameters are being set.
2 Press “enter” after setting the data to confirm, press “Clear” to clear, and press “Esc” to return.
VI Manual Screen
1. Manual forward and backward: refers to moving forward and backward of the stripping head manually(for blade change and machine inspection)
2. Manual feed backward: refers to the opening and closing of the blade (manual retreat can make the blade to the start point)
3. Manual clamping and release: refers to the opening and closing of the clamp (for transfer in the wire clamping).
4. Manual rotation: refers to the rotation of the tripping head (for rotating motor inspection)
5. Electromagnet forward and backward: refers to moving forward and backward of the top rod (for tool change and machine inspection). When clicking on the electromagnet forward, the blade must be in the open state.
6 Speed: refers to the manual speed (3000 is relatively good)
V Setting and Debugging of Wire Stripping Parameter
Illustration N wire setting
Number of layer Thread Stripping head Wire diameter Retreat Cutting time Rotary stripping
The first layer 6 7 0.6 0.1 0.2 0
The second layer 3 2 0.3 0.1 0.2 0
The third layer 9 10 0.9 0.1 0.2 0
1. As shown in the above figure, set the “thread” of the first layer to be 6, the second layer, 3, and the third layer, 9. The machine automatically running path is 6.3.9, finally back to the starting point. You can also set the “thread” of the first layer to be 3, the second layer,6, and the third layer 9. The machine automatically runs path is:3,6,9, and finally back to the starting point. And you can also set the “thread” to be 9, the second layer, 3, and the third layer, 6. The machine automatically runs paths 9, 3, 6, and finally back to the starting point.
In multi-layer wire stripping, concerning the above setting, you can arbitrarily set the strip-ping path to achieve the best effect when stripping.
2. If the wire has 9 layers, you have to set the parameters in the 9 setting screens and press the reset to start after completing setting back to the home screen.
User Notice
User name: Address:
Machine Model: Number:
Purchase date: Dealer seal:
First, the warranty period of the machine from the purchase date is one year, and consumables are not covered within the warranty (including blade, internal hexagonal wrench, foot switch, power line, spring, belt, etc.)
Second, the following conditions are not covered by the warranty:
(1)Machine damage caused by natural disasters
(2)Machine malfunction due to operation failure
(3)During the warranty period, if the non-company personnel has disassembled or repaired the machine, the warranty shall be deemed to be automatically abolished.
(4)Damage caused by the use of the consumables or accessories of other companies.
(5)Damage caused by the use of voltage not specified by our company.
Third, Except for this warranty, the relevant warranty card issued by any other companies or other persons is not recognized by our company.
Fourth, Please keep the receipt of the warranty card and the official purchase of the machine, which should be shown out in repair for the inspection of our company.
Fifth, If the warranty card has no purchase seal and purchase date, it will automatically be invalid.
link : 中文 | Русский | Français | Español | English | العربية | Deutsch | 日本語| Nederlands| Português|
×

WeChat: +8618965153335
- Categories
- Cable Coiling & Binding
- Tape Winding Machine
- Semi-Auto Wire Brush Machine
- Wire Cutting & Stripping
- Semi-Auto Crimping Machine
- Contact Us
 sales@cablecutting.net
 kevin201166
 +86-18965153335