 English
 Chinese
 Russian
 French
 Spanish
 Arabic
 German
 Dutch
Dutch Portuguese
 Italian
 Turkish
 Korean
 Japanese
 Thai
Thai Czech
Czech Traditional Chinese
 Indonesian
 Vietnamese
 Hungarian
 Malay
Malay Swedish
 Finnish
 Danish
 Norwegian
 Polish
 Greek
Greek
- Cable Coiling & Binding
- Tape Winding Machine
- Semi-Auto Wire Brush Machine
- Wire Cutting & Stripping
- Semi-Auto Crimping Machine
- Wire Stripper Crimper Blades
- Terminal Tensile Tester
- Cut-Off Machine
- Cable Labeling Machine
- Strapping Banding Tool
- Wire Terminals & Connectors
- Automated Tape Dispenser
- Automatic Wire Crimping Machine
- Terminal Crimping Tools
- Automatic Wire Feeder
- Automatic Soldering Machine
- Nylon Cable Tie Machine
- Injection Molding Machine
- Brazing & Welding Machine
- Screw Fastening Machine
- Power Cord Crimping Machine
- Wire Harness Tester
- Glue Dispensing Robot
- Wire Harness Packing Materials
- Wire Harness Auxiliary Equipment
New products


Home > JingWei Technology Blog
Small Square Touch Screen Intelligent Wire Stripping Machine Operation Manual | Multi-Function Cable Cutting & Stripping Machine Guide
This operation manual applies to multi-model touch screen intelligent wire stripping machines, supporting wire cutting, head/tail/middle stripping for BV, BVR and sheathed wires, featuring air-source-free automatic operation, 3-year warranty and Chinese-English switchable touch control system.
Description of intelligent wire stripping machine function
intelligent wire stripping machine is suitable for cutting, head stripping , tails stripping , middle stripping and three-layer special stripping of hard-wired (BV wire), multi-stranded soft-wired (BVR wire) and sheathed wire. The maximum cutting cross-sectional area is 185mm2, the maximum cutting length is 400m, the maximum head stripping is about 500mm, and the maximum tail stripping is 200mm. The entire machining process is carried out by the motor automatically lifting the wheel and tube, no need to connect air source. Only need to input the total length, outer sheath diameter of wire, and head and tail peeling values according to the actual processed wire size to intelligently judge the parameters and easily complete all actions without any professionals, achieving intelligent and simple operation.
Precautions for safe use
First of all, thank you very much for purchasing series intelligent wire stripping machine! To ensure that you could use the machine safely and correctly, please read this instruction manual carefully.
1.Power: AC220-250V/AC110V 50-60HZ
In order to ensure that the voltage is stable when the machine is working, please use a power regulator to prevent excessive voltage from burning the machine.
2.Do not use the machine near areas with strong electromagnetic fields to avoid interference to the machine.
3.Do not place any objects on the machine; do not be close to corrosive chemicals. The working environment must be kept dry, ventilated, and dust-free. The suitable room temperature for working is: 0-35°C.
4.If unsatisfactory stripping results or malfunctions occur when using the machine, please read the troubleshooting methods in this operation manual. If you still cannot solve the problem, please call our technical service hotline for inspection and repair. For your own safety, please do not dismantle the machine.
After-sales service commitment
intelligent wire stripping machine
Stable and durable,Quality guaranteed for 3-years
series intelligent wire stripping machines have a 3-year warranty. If the machine fails due to non-human damage, damaged parts will be replaced free of charge (except wearing parts: blades, belts, iron wheels). After the 3-year warranty period, our company will continue to provide after-sales service to customers.
The following situations are not covered by the warranty:
1. Damaged by the user due to improper transportation, installation, use and storage;
2. Damage caused by disassembly by the user or disassembly and repair at a repair point not designated by the company;
3. Damage caused by accidental electricity, fire, flood, etc.;
4. Damaged due to failure to operate according to the operating requirements in this instruction manual;
5. Damage caused by force majeure factors;
intelligent wire stripping machine is suitable for cutting, head stripping , tails stripping , middle stripping and three-layer special stripping of hard-wired (BV wire), multi-stranded soft-wired (BVR wire) and sheathed wire. The maximum cutting cross-sectional area is 185mm2, the maximum cutting length is 400m, the maximum head stripping is about 500mm, and the maximum tail stripping is 200mm. The entire machining process is carried out by the motor automatically lifting the wheel and tube, no need to connect air source. Only need to input the total length, outer sheath diameter of wire, and head and tail peeling values according to the actual processed wire size to intelligently judge the parameters and easily complete all actions without any professionals, achieving intelligent and simple operation.
First of all, thank you very much for purchasing series intelligent wire stripping machine! To ensure that you could use the machine safely and correctly, please read this instruction manual carefully.
1.Power: AC220-250V/AC110V 50-60HZ
In order to ensure that the voltage is stable when the machine is working, please use a power regulator to prevent excessive voltage from burning the machine.
2.Do not use the machine near areas with strong electromagnetic fields to avoid interference to the machine.
3.Do not place any objects on the machine; do not be close to corrosive chemicals. The working environment must be kept dry, ventilated, and dust-free. The suitable room temperature for working is: 0-35°C.
4.If unsatisfactory stripping results or malfunctions occur when using the machine, please read the troubleshooting methods in this operation manual. If you still cannot solve the problem, please call our technical service hotline for inspection and repair. For your own safety, please do not dismantle the machine.
After-sales service commitment
intelligent wire stripping machine
Stable and durable,Quality guaranteed for 3-years
series intelligent wire stripping machines have a 3-year warranty. If the machine fails due to non-human damage, damaged parts will be replaced free of charge (except wearing parts: blades, belts, iron wheels). After the 3-year warranty period, our company will continue to provide after-sales service to customers.
The following situations are not covered by the warranty:
1. Damaged by the user due to improper transportation, installation, use and storage;
2. Damage caused by disassembly by the user or disassembly and repair at a repair point not designated by the company;
3. Damage caused by accidental electricity, fire, flood, etc.;
4. Damaged due to failure to operate according to the operating requirements in this instruction manual;
5. Damage caused by force majeure factors;
1. Machine appearance and function description
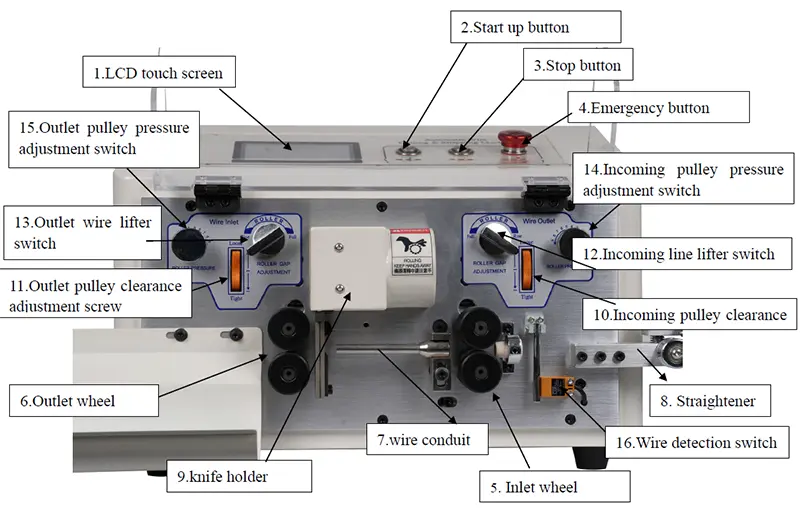
Description of machine:
1.LCD touch screen: Display parameters, all parameters are input from this LCD touch screen
2.Start up button: When the machine is in reset state, Press this key to start the machine.
3.Stop button: When the machine is working, press this key, the machine will stop after finishing the work.
4.Emergency button: When the machine is working, press this key, the machine stops instantly.
5.Inlet wheel: The rotation of the wheel drives the wire forward.
6.Outlet wheel: The rotation of the wheel drives the wire forward.
7. wire conduit: Wire is delivered through this conduit.
8.Straightener: Straighten the bent wire so that it enters the machine smoothly.
9. knife holder: Cutter device, wire cutting and stripping are completed by the knife holder.
10.Incoming pulley clearance: Adjust the gap between the top and bottom of the inlet pulley.
11.Outlet pulley clearance adjustment screw: Adjust the gap between the top and bottom of the outlet pulley.
12.Incoming line lifter switch: This switch can lift the incoming wire pulley in the air.
13.Outlet wire lifter switch: This switch can lift the outlet pulley in the air.
14.Incoming pulley pressure adjustment switch: Adjust the pressure tightness between the upper and lower pulleys.
15.Outlet pulley pressure adjustment switch: Adjust the pressure tightness between the upper and lower wheels
16.Wire detection switch:When the wire detection switch is turned on in the function settings, the machine will alarm if there is no wire.
Control Panel Diagram Operation Instructions
Turn on the power, the LCD screen will display the picture as shown in the figure.
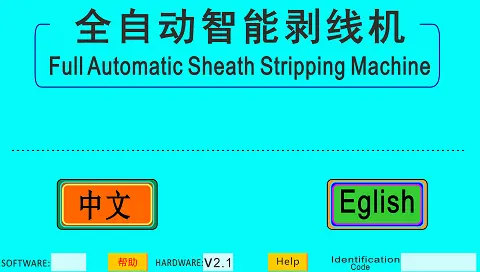
Chinese and English can be switched freely, please select "Chinese" or "ENGLISH" to enter the next page.
The following is the main page of parameter setting
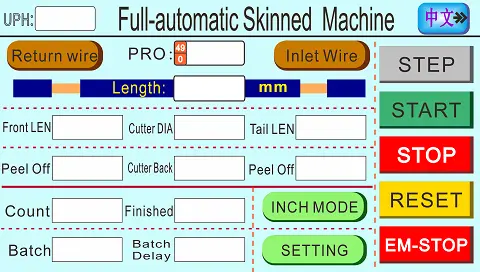
The operation interface of this system consists of a 160×107 LCD touch screen. The following will introduce the function of each key:
Return wire:Press and hold this key, the wire can be transported through the wire inlet and the wire feeding wheel, and the wire can be withdrawn from the cutting edge, and can be freely adjusted as required.
Inlet wire:Press and hold this key, the wire can be conveyed to the cutting edge through the wire inlet under the transmission of the wire feeding wheel, and can be adjusted freely according to needs.
PRO:The program number. The parameters of the wire rods of various specifications that need to be processed are stored in different program numbers, so that they can be called out for use next time.
Length:Total length of cut and stripped wire (max 100m).
Front LEN:The length of the wire head to be stripped of the outer sheath; that is, the length of the copper wire to be removed from the outer sheath.
Peel off:When the stripping value is greater than the wire end value, it is full stripping, otherwise it is half stripping.
Tail LEN:The length of the wire tail stripped from the outer sheath; that is, the length of the copper wire exposed when the outer sheath is removed.
Cutter DIA:The depth at which the cutter cuts the outer skin when peeling. The larger the knife width, the shallower the cut. The smaller it is, the deeper it will be cut.
(Important reminder): The wire diameter value can be entered according to the actual wire outer diameter, but it should be slightly smaller than the actual size by about 1-2mm to cut the outer skin. For example: the outer diameter of the wire outer sheath is 5mm, and the wire diameter should be entered around 4.5mm, If the copper wire is damaged, increase the value; if the wire head or tail cannot be peeled off, decrease the value)
Cutter Back:The value that the cutter will retract after cutting into the wire when peeling off the skin; to ensure that the cutter can catch the wire and peel off the skin. The thicker the wire, the larger the retraction value, and the thinner the wire, the smaller the retraction value.
(Retract value: usually set about 0.5-3mm, which means the cutter retracts 0.5-3mm)
Count: Set the planned production quantity. When the wire processed by the machine reaches this value, the machine will automatically stop and give a prompt.
Batch:Set the production bundling quantity, and the machine can pause for a few seconds when reaching the quantitative number, and pause according to the time input by the timer.
Finished: Displays the actual total quantity currently produced. When "Finished" = "Count", the machine automatically stops.
Batch delay:When the machine reaches the set "Batch" number, the machine will pause according to the set time. If it is set to 1, it will pause for 1 second, if it is set to 2, it will pause for 2 seconds, and so on. When set to "0", the machine stops and you need to manually press the start button to continue running.
Step:Press the start button in the automatic mode, and the machine will automatically run to the set total value and then stop; press the start button in the single-step mode, the machine will only work for one step, press the start button before continuing to the next step; in the single-cycle mode Press the start button and the machine will run for one cycle (cutting one line)
Start:It has the same function as the green solid button on the operation panel. Press it once, and the machine will start until the processing quantity reaches the set total amount.
Stop:It has the same function as the yellow solid button on the operation panel. Press it once and the machine will stop automatically after processing the wire.
Reset:After setting the parameters, it must be reset once to start.
EM-Stop:It has the same function as the red solid button on the operation panel. Press it when the machine is working, and the machine will stop instantly; when the machine stops, the machine must be reset to start.
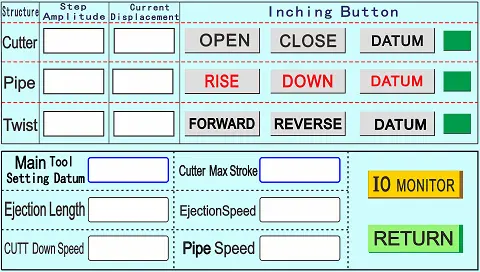
【Open/Close/Datum】
These three buttons are switches that need to be called when calibrating the cutter.
Open:When you click "Open" continuously, the upper and lower cutters will slowly open a certain distance.
Close:When you click "Close" continuously, the upper and lower cutters slowly approach each other until the closures cross each other.
Datum:Click the "Datum" button to quickly return the cutter to the original position.
【parameter settings】Page Setup Instructions
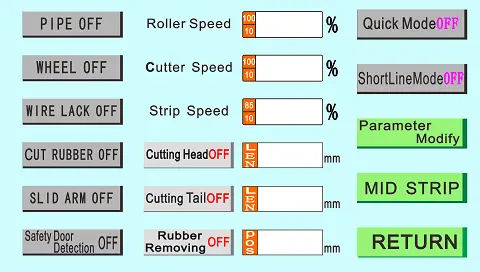
Pipe on:The wire conduit can beat.
Wheel on:The outlet pulley can be lifted when stripping the wire head(The machine with the cylinder lift function has this function).
Wire lack off:After the machine is started, there is no wire in the front wheel, and the machine stops automatically.
Cut rubber off:After the machine is started, when peeling off the outer sheath, squeeze the clip to knock off the stripped waste skin.
Slid arm off:This function requires a robot hand to be installed.
Roller speed:The rotation speed of the incoming and outgoing wire pulleys can be adjusted from 1 to 100, with 1 being the slowest and 100 being the fastest.
Cutter speed:Set the running speed of the cutter, the adjustable range is 1-100, 1 is the slowest, and 100 is the fastest.
Strip speed:The speed of peeling off the wire sheath can be adjusted in the range of 1-100, with 1 being the slowest and 100 being the fastest.
Cut down speed:Set the cutter running speed when the cutter is cutting, the adjustable range is 1-100, 1 is the slowest, and 100 is the fastest.
Ejection speed:Set the running speed of the wire outlet wheel when the wire is discharged. The adjustable range is 1-100, 1 is the slowest, and 100 is the fastest.
【Length modify】Parameter setting description
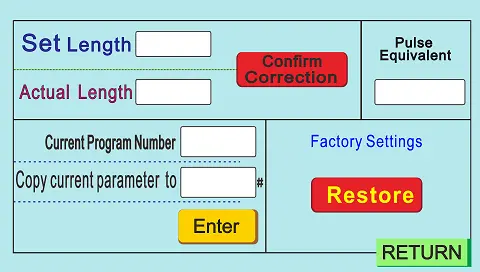
【Length modify】:It is used to correct the error in the length of the actual processing wire.
Set length:Sets the value of the length of the line to be trimmed.
Actual length:The actual length value cut by the machine.
After entering this actual value,Press【Length modify】, the machine will cut a line with the same length as the set length.
Actual cutter Dia:Set actual wire diameter.
Wire diameter coefficient:In general, no need to set, the system defaults.
Factory set:Press this key to restore the parameters set by the machine to the original state. It is recommended not to press this key.
【Middle peel setting】:Press and enter the following setting

【Mid cut on/ off】In the open mode, the total length, line head and line tail length of the main page are associated. A total of 16 middle peels, 01 positions【Length】Enter the position of the first cut in the middle,【Cut open】is the distance drawn. For example:The total length is 200mm, strip 20mm at the middle 100mm to expose the copper wire, that is, set 01 length = 100, strip = 20.
Press【IO Monitor】to enter the following setting page
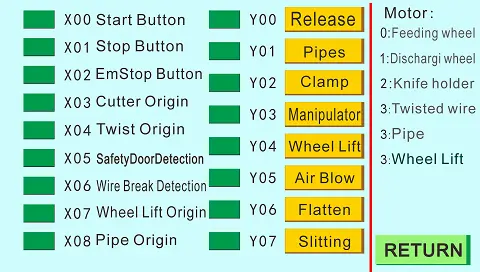
Each IO monitoring point corresponds to each wiring point of the main board. Usually, the monitoring is turned on when the machine is abnormal to determine the problem.
Tips for stripping and debugging:
When debugging after inputting parameters, first switch the "automatic" mode to the "single-step" mode to test the wire. After achieving satisfactory results, switch to the "automatic" mode to formally process the wire.
Description of machine:
1.LCD touch screen: Display parameters, all parameters are input from this LCD touch screen
2.Start up button: When the machine is in reset state, Press this key to start the machine.
3.Stop button: When the machine is working, press this key, the machine will stop after finishing the work.
4.Emergency button: When the machine is working, press this key, the machine stops instantly.
5.Inlet wheel: The rotation of the wheel drives the wire forward.
6.Outlet wheel: The rotation of the wheel drives the wire forward.
7. wire conduit: Wire is delivered through this conduit.
8.Straightener: Straighten the bent wire so that it enters the machine smoothly.
9. knife holder: Cutter device, wire cutting and stripping are completed by the knife holder.
10.Incoming pulley clearance: Adjust the gap between the top and bottom of the inlet pulley.
11.Outlet pulley clearance adjustment screw: Adjust the gap between the top and bottom of the outlet pulley.
12.Incoming line lifter switch: This switch can lift the incoming wire pulley in the air.
13.Outlet wire lifter switch: This switch can lift the outlet pulley in the air.
14.Incoming pulley pressure adjustment switch: Adjust the pressure tightness between the upper and lower pulleys.
15.Outlet pulley pressure adjustment switch: Adjust the pressure tightness between the upper and lower wheels
16.Wire detection switch:When the wire detection switch is turned on in the function settings, the machine will alarm if there is no wire.
Control Panel Diagram Operation Instructions
Turn on the power, the LCD screen will display the picture as shown in the figure.
Chinese and English can be switched freely, please select "Chinese" or "ENGLISH" to enter the next page.
The following is the main page of parameter setting
The operation interface of this system consists of a 160×107 LCD touch screen. The following will introduce the function of each key:
Return wire:Press and hold this key, the wire can be transported through the wire inlet and the wire feeding wheel, and the wire can be withdrawn from the cutting edge, and can be freely adjusted as required.
Inlet wire:Press and hold this key, the wire can be conveyed to the cutting edge through the wire inlet under the transmission of the wire feeding wheel, and can be adjusted freely according to needs.
PRO:The program number. The parameters of the wire rods of various specifications that need to be processed are stored in different program numbers, so that they can be called out for use next time.
Length:Total length of cut and stripped wire (max 100m).
Front LEN:The length of the wire head to be stripped of the outer sheath; that is, the length of the copper wire to be removed from the outer sheath.
Peel off:When the stripping value is greater than the wire end value, it is full stripping, otherwise it is half stripping.
Tail LEN:The length of the wire tail stripped from the outer sheath; that is, the length of the copper wire exposed when the outer sheath is removed.
Cutter DIA:The depth at which the cutter cuts the outer skin when peeling. The larger the knife width, the shallower the cut. The smaller it is, the deeper it will be cut.
(Important reminder): The wire diameter value can be entered according to the actual wire outer diameter, but it should be slightly smaller than the actual size by about 1-2mm to cut the outer skin. For example: the outer diameter of the wire outer sheath is 5mm, and the wire diameter should be entered around 4.5mm, If the copper wire is damaged, increase the value; if the wire head or tail cannot be peeled off, decrease the value)
Cutter Back:The value that the cutter will retract after cutting into the wire when peeling off the skin; to ensure that the cutter can catch the wire and peel off the skin. The thicker the wire, the larger the retraction value, and the thinner the wire, the smaller the retraction value.
(Retract value: usually set about 0.5-3mm, which means the cutter retracts 0.5-3mm)
Count: Set the planned production quantity. When the wire processed by the machine reaches this value, the machine will automatically stop and give a prompt.
Batch:Set the production bundling quantity, and the machine can pause for a few seconds when reaching the quantitative number, and pause according to the time input by the timer.
Finished: Displays the actual total quantity currently produced. When "Finished" = "Count", the machine automatically stops.
Batch delay:When the machine reaches the set "Batch" number, the machine will pause according to the set time. If it is set to 1, it will pause for 1 second, if it is set to 2, it will pause for 2 seconds, and so on. When set to "0", the machine stops and you need to manually press the start button to continue running.
Step:Press the start button in the automatic mode, and the machine will automatically run to the set total value and then stop; press the start button in the single-step mode, the machine will only work for one step, press the start button before continuing to the next step; in the single-cycle mode Press the start button and the machine will run for one cycle (cutting one line)
Start:It has the same function as the green solid button on the operation panel. Press it once, and the machine will start until the processing quantity reaches the set total amount.
Stop:It has the same function as the yellow solid button on the operation panel. Press it once and the machine will stop automatically after processing the wire.
Reset:After setting the parameters, it must be reset once to start.
EM-Stop:It has the same function as the red solid button on the operation panel. Press it when the machine is working, and the machine will stop instantly; when the machine stops, the machine must be reset to start.
【Open/Close/Datum】
These three buttons are switches that need to be called when calibrating the cutter.
Open:When you click "Open" continuously, the upper and lower cutters will slowly open a certain distance.
Close:When you click "Close" continuously, the upper and lower cutters slowly approach each other until the closures cross each other.
Datum:Click the "Datum" button to quickly return the cutter to the original position.
【parameter settings】Page Setup Instructions
Pipe on:The wire conduit can beat.
Wheel on:The outlet pulley can be lifted when stripping the wire head(The machine with the cylinder lift function has this function).
Wire lack off:After the machine is started, there is no wire in the front wheel, and the machine stops automatically.
Cut rubber off:After the machine is started, when peeling off the outer sheath, squeeze the clip to knock off the stripped waste skin.
Slid arm off:This function requires a robot hand to be installed.
Roller speed:The rotation speed of the incoming and outgoing wire pulleys can be adjusted from 1 to 100, with 1 being the slowest and 100 being the fastest.
Cutter speed:Set the running speed of the cutter, the adjustable range is 1-100, 1 is the slowest, and 100 is the fastest.
Strip speed:The speed of peeling off the wire sheath can be adjusted in the range of 1-100, with 1 being the slowest and 100 being the fastest.
Cut down speed:Set the cutter running speed when the cutter is cutting, the adjustable range is 1-100, 1 is the slowest, and 100 is the fastest.
Ejection speed:Set the running speed of the wire outlet wheel when the wire is discharged. The adjustable range is 1-100, 1 is the slowest, and 100 is the fastest.
【Length modify】Parameter setting description
Set length:Sets the value of the length of the line to be trimmed.
Actual length:The actual length value cut by the machine.
After entering this actual value,Press【Length modify】, the machine will cut a line with the same length as the set length.
Actual cutter Dia:Set actual wire diameter.
Wire diameter coefficient:In general, no need to set, the system defaults.
Factory set:Press this key to restore the parameters set by the machine to the original state. It is recommended not to press this key.
【Middle peel setting】:Press and enter the following setting
Press【IO Monitor】to enter the following setting page
Tips for stripping and debugging:
When debugging after inputting parameters, first switch the "automatic" mode to the "single-step" mode to test the wire. After achieving satisfactory results, switch to the "automatic" mode to formally process the wire.

×

Scan to Chat
🤖 AI Assistant
×
End Chat & Send Transcript
 sales@cablecutting.net
 kevin201166
 +86-18965153335